Recently a series of blog posts by Jim Gettys has started a lot of interesting discussions and research around the Bufferbloat problem. Bufferbloat is the term Gettys’ coined to describe huge packet buffers in network equipment which have been added through ignorance or a misguided attempt to avoid packet loss. These oversized buffers have the affect of greatly increasing latency when the network is under load.
If you’ve ever tried to use an application which requires low latency, such as VoIP or a SSH terminal at the same time as a large data transfer and experienced high latency then you have likely experienced Bufferbloat. What I find really interesting about this problem is that it is so ubiquitous that most people think this is how it is supposed to work.
I’m not going to repeat all of the details of the Bufferbloat problem here (see bufferbloat.net) but note that Bufferbloat occurs at may different places in the network. It is present within network interface device drivers, software interfaces, modems and routers.
For many the first instinct of how to respond to Bufferbloat is add traffic classification, which is often referred to simply as QoS. While this can also be a useful tool on top of the real solution it does not solve the problem. The only way to solve Bufferbloat is a combination of properly sizing the buffers and Active Queue Management (AQM).
As it turns out I’ve been mitigating the effects of Bufferbloat (to great benefit) on my home Internet connection for some time. This has been accomplished through traffic shaping, traffic classification and using sane queue lengths with Linux’s queuing disciplines. I confess to not understanding, until the recent activity, that interface queues and driver internal queues are also a big part of the latency problem. I’ve since updated my network configuration to take this into account.
In the remainder of this post I will show the effects that a few different queuing configurations have on network latency. The results will be presented using a little utility I developed called Ping-exp. The name is a bit lame but Ping-exp has made it a lot easier for me to compare the results of different network traffic configurations.
My Internet connection is PPPoE based and a operates at a the modest speed of ~4Mbps download and ~768Kbps upload.
In the results below I only show data from HostA because the results are very similar on HostB. I had originally planned to perform some experiments which involved per-host fairness but that will have to wait for another time.
Each network configuration was tested under the four network load scenarios outlined in the table below. In each case there was a short interval of approximately one minute between starting the load and running Ping-exp. All load was generated from HostA.
Even with the sane maximum latency as mentioned above this amount of packet loss would likely make any interactive service which relies on TCP (such as an SSH terminal) unusable due to the time required to recover from lost packets. I suspect 10% packet would also make VoIP conversations unusable but I don’t have any data to back that up.
The only change between this experiment (#3) and #2 is the replacement of the PFIFO queue on the gateway with a SFB queue. SFB has the ability to mark IP packets via ECN when they experience congestion. Both Host A and Dest2 have ECN enabled and ECN marked IP and TCP packets were observed during this test.
Comparing figure 8 against figures 2 and 5 shows that SFB does have a better latency profile vs a simple FIFO but the packet loss is also significantly higher. I haven’t done enough experimentation with SFB to really understand how to use it effectively but these results do seem to indicate that it’s worth spending more time with.
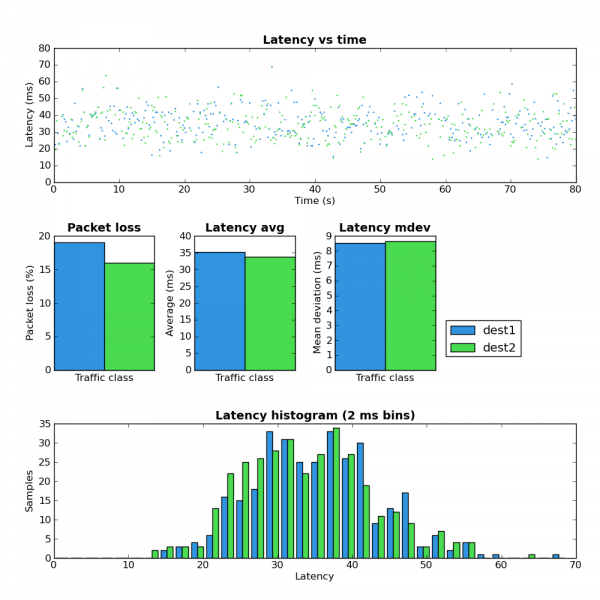
In this test the bidirectionally loaded link shows a lot of packet loss but latency is better than the other scenarios.
When I started this post I had hoped to go through a few more scenarios but that will have to wait for another time. Specifically I wanted to show the results of the somewhat more complicated scheme that I use on a daily basis. This scheme gives much better results than any of the ones presented above. If you are interested and understand how to use tc you can see the scripts here.
http://www.coverfire.com/archives/2011/02/21/network-latency-experiments/
If you’ve ever tried to use an application which requires low latency, such as VoIP or a SSH terminal at the same time as a large data transfer and experienced high latency then you have likely experienced Bufferbloat. What I find really interesting about this problem is that it is so ubiquitous that most people think this is how it is supposed to work.
I’m not going to repeat all of the details of the Bufferbloat problem here (see bufferbloat.net) but note that Bufferbloat occurs at may different places in the network. It is present within network interface device drivers, software interfaces, modems and routers.
For many the first instinct of how to respond to Bufferbloat is add traffic classification, which is often referred to simply as QoS. While this can also be a useful tool on top of the real solution it does not solve the problem. The only way to solve Bufferbloat is a combination of properly sizing the buffers and Active Queue Management (AQM).
As it turns out I’ve been mitigating the effects of Bufferbloat (to great benefit) on my home Internet connection for some time. This has been accomplished through traffic shaping, traffic classification and using sane queue lengths with Linux’s queuing disciplines. I confess to not understanding, until the recent activity, that interface queues and driver internal queues are also a big part of the latency problem. I’ve since updated my network configuration to take this into account.
In the remainder of this post I will show the effects that a few different queuing configurations have on network latency. The results will be presented using a little utility I developed called Ping-exp. The name is a bit lame but Ping-exp has made it a lot easier for me to compare the results of different network traffic configurations.
My Home Network
The figure below outlines what my home network looks like. It’s pretty standard except for the addition of the Linux server (Dest2) which lives at my local ISP. By tunneling traffic between Dest2 and my home router I can control the downstream traffic in a way not available to most Internet users.My Internet connection is PPPoE based and a operates at a the modest speed of ~4Mbps download and ~768Kbps upload.
Experimental Design
In each of the experiments below Ping-exp was run on both hosts A and B, pinging both Dest1 and Dest2, five times per second, with a total of 400 pings (80 seconds)../ping-exp.py -w test.data -t 'dest1,<IP1>,0' -t 'dest2,<IP2>,0' -i .2 -c 400[Replace <IP1> and <IP2> if cutting and pasting the above]
In the results below I only show data from HostA because the results are very similar on HostB. I had originally planned to perform some experiments which involved per-host fairness but that will have to wait for another time.
Each network configuration was tested under the four network load scenarios outlined in the table below. In each case there was a short interval of approximately one minute between starting the load and running Ping-exp. All load was generated from HostA.
| Load | Description |
| Empty | No traffic |
| Upload | 2 TCP uploads to C |
| Download | 3 TCP downloads from C |
| Both | 2 TCP uploads to C and 3 TCP downloads from C |
Experiment 1: Defaults
In this experiment all device queues and traffic management configurations were unmodified from the Linux defaults.Network Load: Empty
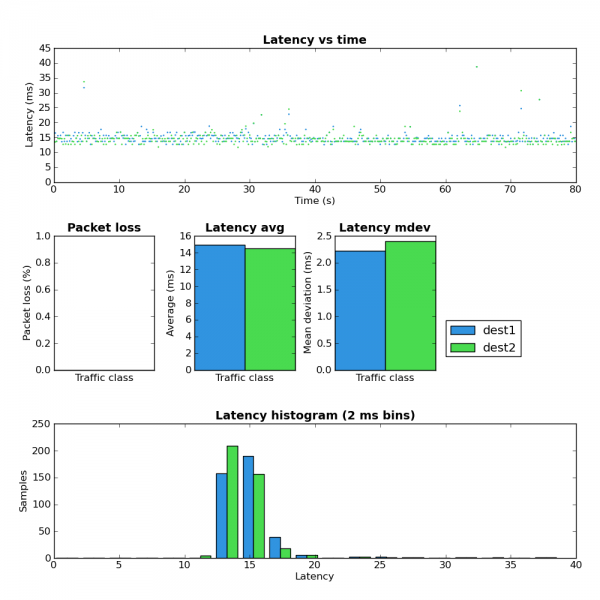
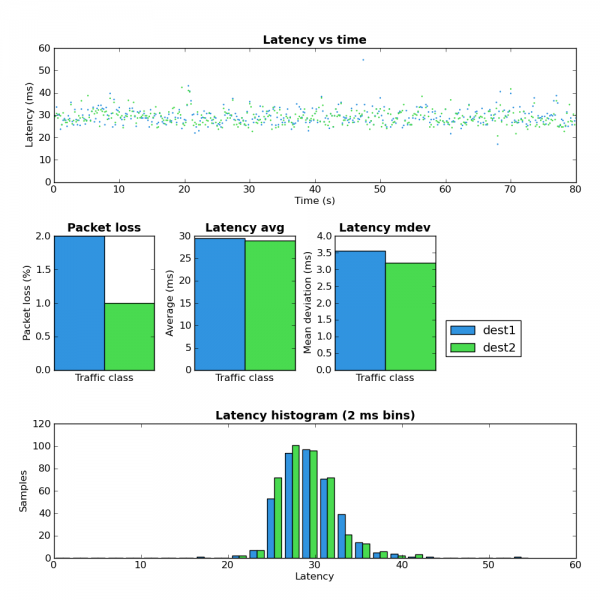
Figure 1 provides a baseline for the network with no traffic.Network Load: Upload
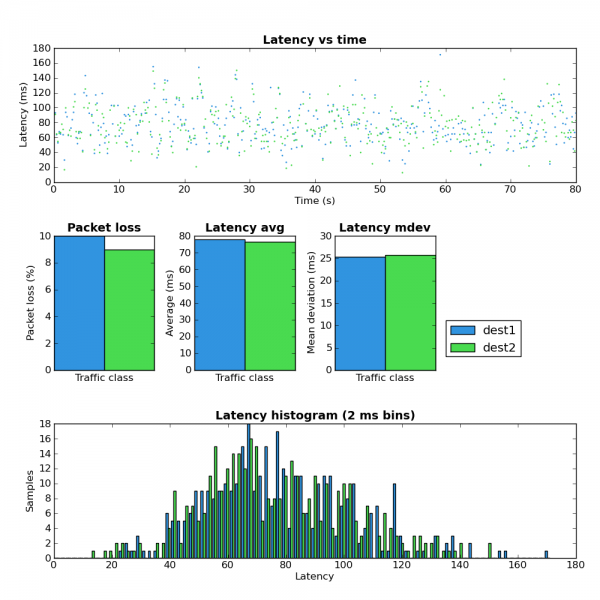
Comparing figure 1 and figure 2 shows that when the upload portion of the link is under load both the latency and jitter greatly increase. However the maximum observed RTT at ~180ms isn’t terribly high which seems to indicate the upstream portion of the network does not suffer from extream Bufferbloat. Notice that the amount of packet loss increased from 0% to ~10%.Even with the sane maximum latency as mentioned above this amount of packet loss would likely make any interactive service which relies on TCP (such as an SSH terminal) unusable due to the time required to recover from lost packets. I suspect 10% packet would also make VoIP conversations unusable but I don’t have any data to back that up.
Network Load: Download
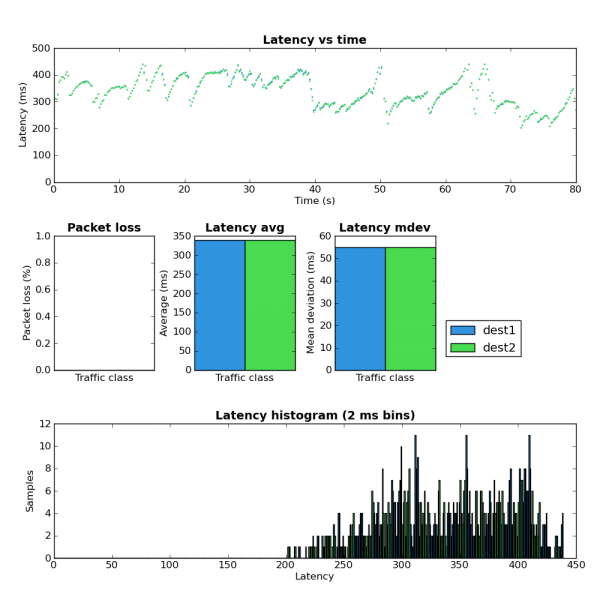
It’s hard to look at Figure 3 and not immediately be drawn to the interesting latency pattern in the top chart. I suspect that the relatively slow latency increases followed by a sudden latency drop are the result of the network queues filling and then quickly emptying after TCP reduces the send rate when it finally receives a loss event. There are two other things to note in Figure 3:- The overall latency is much worse in the download path.
- There is no packet loss experienced by the test flows.
Network Load: Both
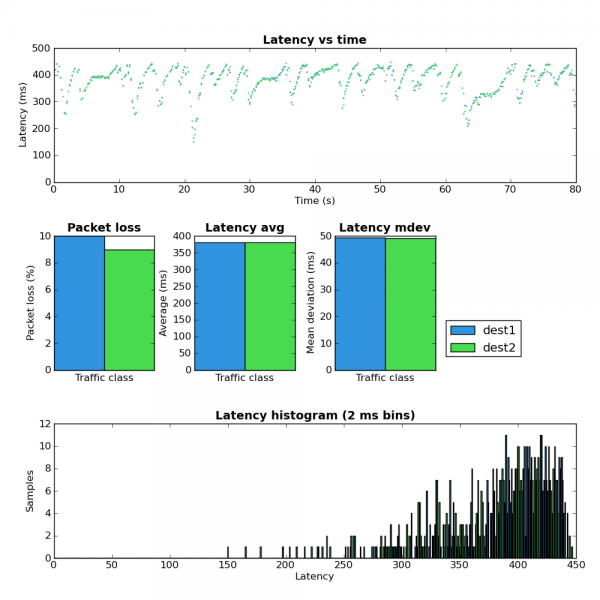
Figure 4 shows the latency results when under both upload and download load. Here the average latency increases beyond either the upload or download only case and the ‘latency sawtooth’ identified in Figure 3 becomes even more pronounced. The packet loss in Figure 4 is very close to the upload case (Figure 2) which matches well with the download results (Figure 3) where no packet loss was observed.Experiment 2: Reduce buffers and shape
In this experiment the buffers on both ends of the Internet connection were reduced as follows:- Gateway
- The TX queue length (ifconfig txqueuelen) was reduced to 1 packet for the ppp0 interface as well as the underlying eth2 interface.
- The queueing discipline on eth2 was changed to a PFIFO with a buffer size of a single packet.
- The queueing discipline on the ppp0 interface was changed to a PFIFO with buffer size of 3 packets which is equal to approximately 50ms at the maximum link rate.
- Dest2
- The TX queue length of the eth0 interface was reduced from the default of 1000 to 10.
- The queueing discipline on the interface towards the home network was set as a PFIFO with a buffer size of 18 packets which is equal to approximately 50ms at the maximum link rate.
Network Load: Empty
As expected performing the test with no network load obtains results very similar to Figure 1.Network Load: Upload
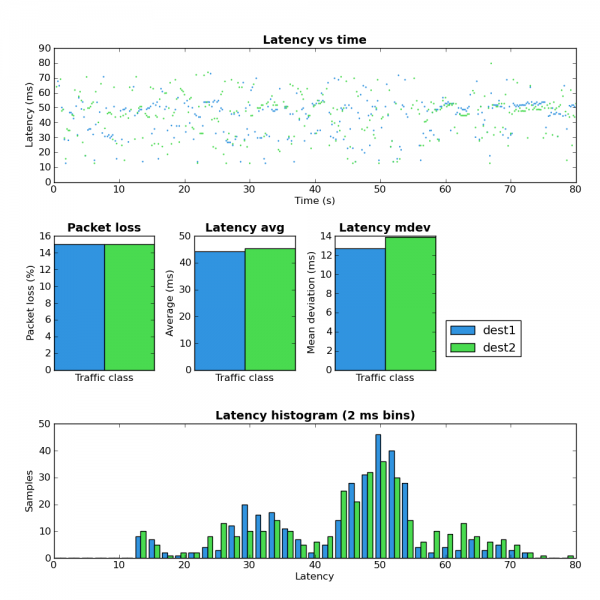
Comparing Figure 5 with Figure 2 shows a much better latency and jitter profile but the amount of packet loss is somewhat higher (~9%->14%).Network Load: Download
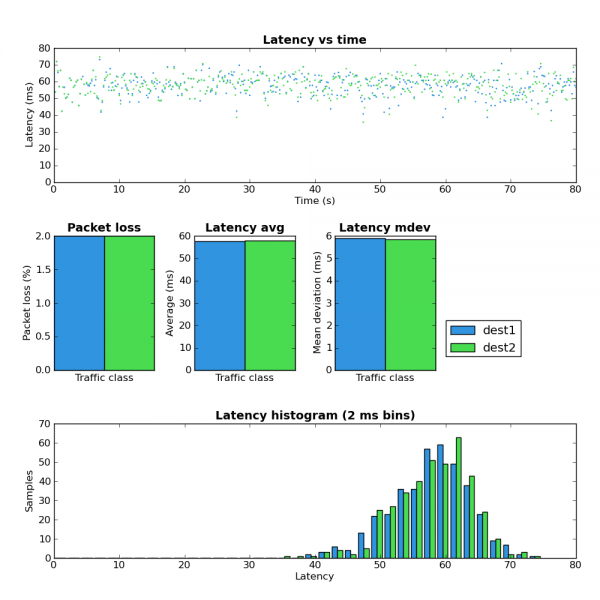
Figure 6 shows no sign of the latency sawtooth behavior observed in Figure 3. This appears to confirm the theory that the large buffers were the cause of this phenomenon. Also note that latency and jitter are vastly improved but there is slightly higher packet loss (0%->2%).Network load: Both
Figure 7 shows a much better latency profile when compared with Figure 4 but note that the packet loss has increased to a very high level.Experiment #3: Reduce interface buffers and shape plus SFB
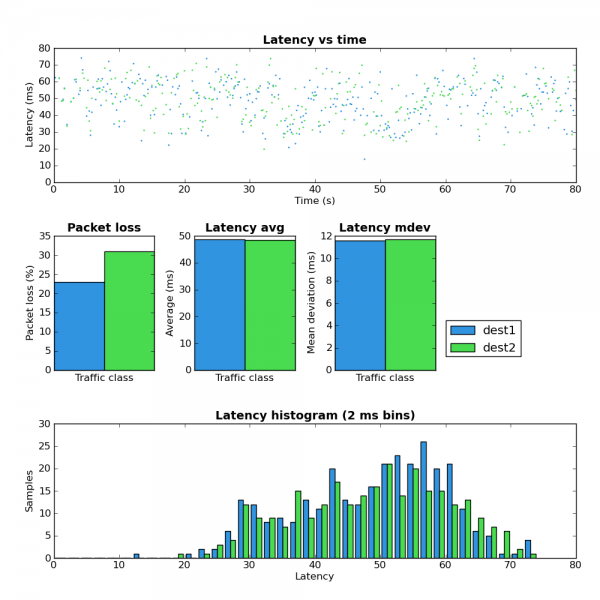
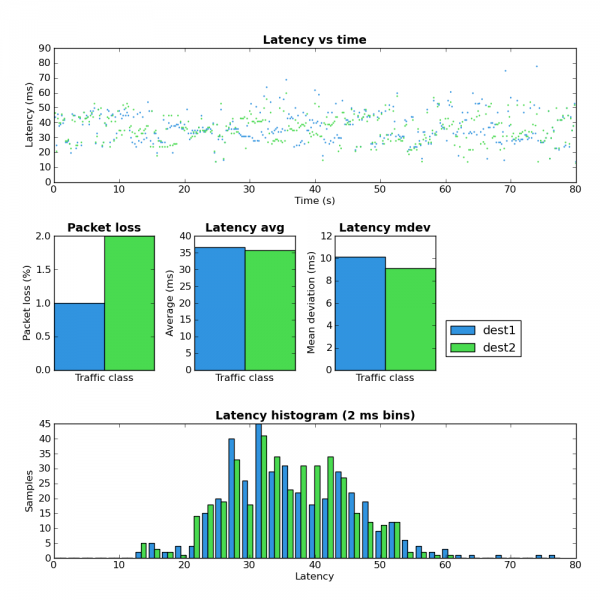
Stochastic Fair Blue is an active queue management (AQM) scheme which has been suggested as a possible solution to the buffer bloat problem. Due to the fact that SFB currently requires a custom kernel module I chose not to install it on Dest2. This server isn’t easy for me to get access to should something go wrong. I did however install it on the local gateway to obtain upload results.The only change between this experiment (#3) and #2 is the replacement of the PFIFO queue on the gateway with a SFB queue. SFB has the ability to mark IP packets via ECN when they experience congestion. Both Host A and Dest2 have ECN enabled and ECN marked IP and TCP packets were observed during this test.
Comparing figure 8 against figures 2 and 5 shows that SFB does have a better latency profile vs a simple FIFO but the packet loss is also significantly higher. I haven’t done enough experimentation with SFB to really understand how to use it effectively but these results do seem to indicate that it’s worth spending more time with.
Experiment #4: Sane buffers plus SFQ
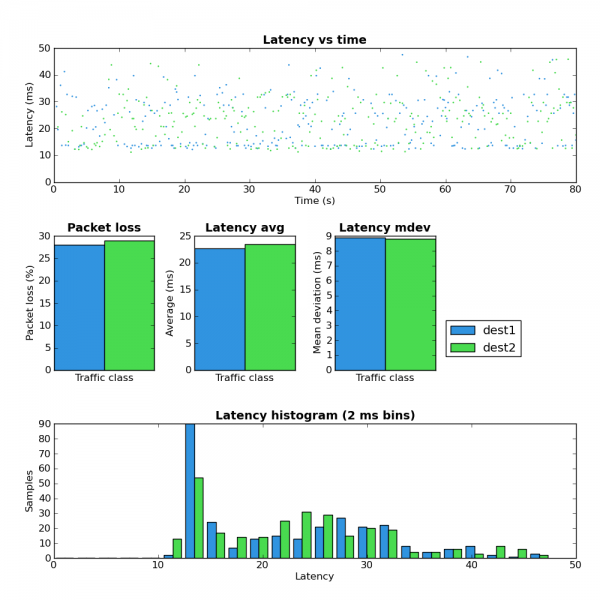
This experiment maintains the buffer size optimizations from experiments 2 and 3 but adds a SFQ queue to each end of the connection. SFQ aims to create per-flow fairness. On the downstream the SFQ queue length (limit parameter) was set to eighteen and on the upstream it was set to three. Both of these values result in approximately 50ms transmission time.Network load: Upload
Figure 9′s direct comparisons are figures 2, 5, 8. Only the SFB case (Figure 8) has lower average latency and all other scenarios have far higher packet loss.Network load: Download
Figure 10′s comparisons are Figures 3 and 6. Figure 10 shows a better latency profile vs the other scenarios with equivalent or better packet loss.Network load: Both
Comparisons: Figures 4 and 7.In this test the bidirectionally loaded link shows a lot of packet loss but latency is better than the other scenarios.
Throughput
During these experiments I did not make any effort to compare the overall network throughput. This would be a worthwhile endeavour but anecdotally at least any throughput difference is relatively minor and is a cost worth paying in order to achieve improved latency.Summary
These experiments show the dramatic difference in network latency which can be obtained by modifying the size of packet buffers and adding a bit of traffic classification (SFQ). Among the tested scenarios, SFQ + sane buffers sizes gives the best performance.When I started this post I had hoped to go through a few more scenarios but that will have to wait for another time. Specifically I wanted to show the results of the somewhat more complicated scheme that I use on a daily basis. This scheme gives much better results than any of the ones presented above. If you are interested and understand how to use tc you can see the scripts here.
http://www.coverfire.com/archives/2011/02/21/network-latency-experiments/

